Vibration reduction on DSLR camera lenses

Here is an answer to a photography question I had for a while: If vibration reduction (VR) on DSLR lenses results in sharper images a low shutter speeds, why would you ever want to turn it off? I remember once checking the Nikon manual, which recommended turning off VR when using a tripod, but did not offer much explanation. Last week while on a ski trip to Lake Tahoe I experienced the importance of this recommendation. While exploring Donner Pass on an off day, I tried taking this picture of me and my dad. I used the timer and rested the camera on a post for the shot. Here’s the final result:

View of Donner Lake from the top of Donner Pass. Truckee, CA.

It was a bright day, so I used a small aperture and fast shutter speed. After attempting the shot I noticed that our faces were slightly blurry. Thinking I had somehow missed focus, I tried again with similar results. Then I tried manual focus, same result. Finally I noticed that the background was about equally blurry. Feeling a bit confused, I tried turning of VR. Below is a 1:1 comparison with and without vibration reduction:

Pixels viewed at 1:1 while using a tripod, with and without vibration reduction.

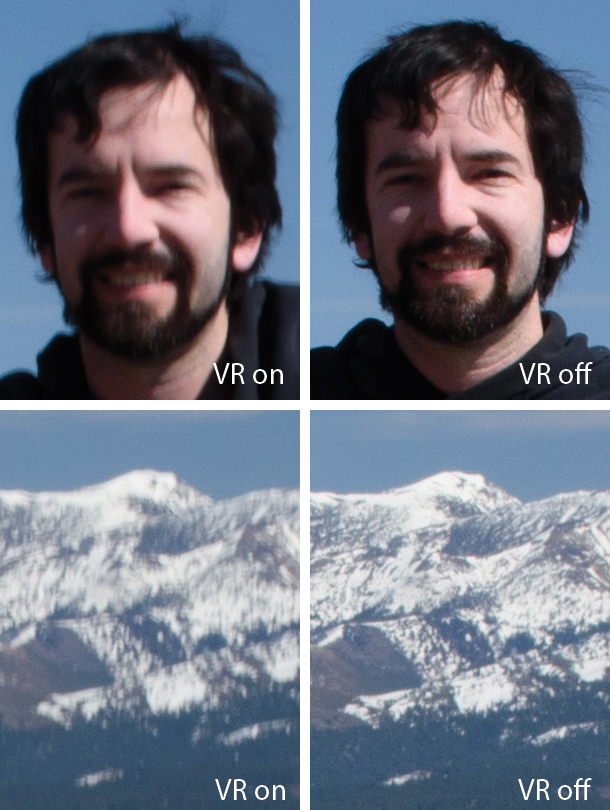
I was surprised to find vibration reduction was make the shot worse. Lesson learned – turn off vibration reduction when using a tripod. It sounds like a feature you should never turn off, but apparently it was over-correcting for handheld vibrations which weren’t happening, since the camera was on a stationary object. I was using an older Nikon AF-S DX ED 18-55mm F3.5-5.6G lens, and it’s possible this issue is not as severe on newer VR II lens.

Skiing the Powder Highway

Image

We drove from Spokane to Calgary, and along the way skied at Red Mountain, Revelstoke, and Kicking Horse. Here is a panorama from the top of Kicking Horse, perhaps the most spectacular view I have ever seen at any ski area ever.

View off the back side of Kicking Horse, British Columbia.

View off the back side of Kicking Horse, British Columbia.

Silverton Mountain

The second part of our ski trip to Colorado a few weeks ago took us to Silverton Mountain.  It is a new ski resort that opened in 2003 with a different skiing philosophy.  They have one lift that takes you to backcountry terrain that can be accessed via short hikes.
You ski in guided groups for safety and to preserve untracked snow.  The idea is that you get to ski steep terrain with fresh powder.

Silverton Mountain chairlift

Silverton Mountain chairlift

Hiking to the top of Silverton Mountain

Hiking to the top.

The downside to Silverton is that it requires more physical exertion for fewer runs.  We skiied 4 runs the first day, and 5 the second day.  We happened to hit it just after a big snowstorm, but the thermometer also hit 60 degrees both days.  There was great powder in the trees, but the snow in the sun was very thick and heavy.  It wasn’t ideal, but we still had a great time and could appreciate the potential the mountain holds.  The clear skies gave us great views of the surrounding scenery.

Storm Peak and the Grande Couloir, Silverton, CO

Storm Peak and the Grande Couloir.

Storm Peak, Silverton, CO

Storm peak and the back side of Silverton, taken from the exit road.

View from Tiger Claw, Silverton, CO

The view from Tiger Claw.

Silverton is definitely a ski area for bros.  The base lodge is a tent with a wood stove and no running water.  It’s main purpose is to serve beer, and it has an interesting collection of bench seats from mini vans to for seating.  The equipment shed is an old school bus buried in the snow.

Silverton Mountain Correctional Facility

When you finish a run, this bus picks you up and brings you back to the lift.

Silverton Mountain base lodge

The base lodge is a tent. The equipment shed is an old school bus.

Silverton Mountain base lodge

Inside the base lodge.